triangles
Well-known member
Sync 2 to Sync 3 FFE upgrade guide:
Sync 3 ditches Microsoft windows CE in favor of Blackberry's QNX operating system. Besides new features and a better UI, the touch screen is MUCH more responsive.
Hardware for the upgrade is as follows:
- Sync 3 APIM and screen. (the Sync 2 screen is not compatible with the Sync 3 module).
- GPS antenna with a Fakra connector (Sync 3 uses a separate GPS antenna unlike Sync 2). I tried a cheaper one by Bingfu that was DOA. Just look for one with a Fakra connector.
- (optional) new USB hub and wiring adapter. Not sure what we need but maybe one of these? (HU5Z19A387A Single USB, HC3Z-19A387-B Double USB) Will update when I have more info.
- ODBII USB dongle and a laptop with FORScan
The USB hub is only required because of crapple's greedy corporate policies of making manufacturers pay a ransom for their hardware to work with crapple phones. If you use android you can use the original USB hub and not fork out ~$50 for a new USB hub.
You can find a Sync 3 APIM in some 2016 models and all 2017+ Lincoln/Ford vehicles. As far as I know all 2016 Focus and Escape were Sync3, there may be other models.
The hard part is finding a Sync 3 APIM with NAV. From what I can tell NAV was optional on the Focus titanium trim but standard on the Escape Titanium trim. So this is what I set out to find.
Aside from local yards, I used car-part.com searching for "TV-screen" of various years Fords/Lincolns. We need an 8" screen. While the Fiesta had Sync 3 it had a smaller screen. You need to be careful as many junkyards will remove the APIM from the back of the screen and then try to sell them as separate pieces for ridiculous prices. I just called the yard and asked if they included the module on the back of the screen. Most places were confused by this as the APIM is not something they inventory. The yard I finally bough from, I had to specifically ask them to include the module with the screen. They said it was not inventoried for them and depending on whoever was pulling the screen from the vehicle they may or may not remove the APIM unless specifically directed not to.
I have compiled a list from several sources with known NAV and Non-NAV APIM part numbers The one I bought was not on either list but it came from a 2018 Escape Titanium so I was fairly confident it had NAV. JJ5T-14G370-ACC
My list compiled in Excel format:
It appears the only difference between the NAV and non-NAV is the size of the EMMC storage chip. The non-NAV do not have enough storage to hold the maps. You can enable the NAV function but you get an error as there are no maps on the unit and no way to add them.
The mounting brackets will be different between the various vehicle models but the brackets from the Sync 2 screen can be reused with the Sync 3 screen. All you need is a T8 torx bit to swap brackets from your existing screen.
This video should help give a good idea of how to remove the bezel around the screen and the screen itself. It is from a how-to install a bypass so you can use the screen while in motion with a video input or add a back up cam to vehicles not originally equipped with them. There are 2 connectors you need to undo to remove the bezel. Both have a latch that you have to squeeze to release.
https://youtu.be/MumIkND0suk
Simply unplug and remove the old screen/apim.
With the exception of adding the new GPS antenna, install is the reverse of removal. You can put the GPS antenna wherever you see fit. I used some 3M double stick emblem tape and reached thru the hole where the screen was, up under the dash next to the center speaker and stuck it on something that was under there. Then you can just stuff the extra antenna wire behind the APIM/screen. The idea is the antenna module needs a clear view of the sky to work best. The plastic of the dash is transparent to the GPS radio signals, metal is not.
Once you have the new screen/APIM all plugged in, I recommend turning things on to make sure it works before buttoning things back up. With the bezel not installed it will create several DTCs but not to worry, as these can all be cleared once we have things back together.
The next step is updating the asbuilt data so the APIM knows what modules your car has and can enable the appropriate features.
I simply found a '18 FFE for sale onlne and went to https://www.motorcraftservice.com/AsBuilt with the vin to download the asbuilt file. You can download the asbuilt file I used here. I figure this is close enuff to my '14 FFE.
This Video shows how to update your car's asbuilt data with the "18 asbuilt file above. https://www.youtube.com/watch?v=OgULPZKISZw
This gets you 90% there but there are still a few tweaks to make things happy. First I wanted to enable climate controls in Sync, not because it's particularly useful, just because I can. I also discovered the "repeater" function. it makes the climate control temp settings appear at the top of the screen when not on the climate control screen. This is done by changing parameter "Climate Control Repeater" = "Dual."

I believe it was changing the parameter "Climate Domain" = "Enable" that turns on the climate screen. For some reason you must use "Europe" for "Climate Control Strategy" too.
Other than that I played around with startup/shutdown screens. What options works seems to depend on what version of Sync 3 you have installed. Before installing Version 3.0 I had Version 2.3, I was able to use the GT startup/shutdown and GT theme. After updating to version 3.0 it didn't work. I settled for the Mustang startup screen with the Lincoln Timeless theme. Which by default gives me the Lincoln shutdown screen LOLz. My poor FFE no longer knows what it is. To get the Lincoln Timeless theme to work I had to change the "Brand" setting to Lincoln.
At this point everything worked except the ambient lighting controls in Sync 3. I also got APIM DTC U0140 that wouldn't go away. I assume this is because my '14 does not have the hardware for Sync to control the ambient lighting as it is already controlled by the module in the overhead console. I found the solution on an Escape forum. This involved changing a parameter which solved the problem. "My solution was to change 7D0-01-02 from xxxA xxxx xxxx to xxxD xxxx xxxx. This had the effect of (1) removing the "Ambient Lighting" settings screen from the Sync 3 display (which I view as unnecessarily redundant since I have the headliner controls, not to mention the Sync 3 ambient lighting buttons not working) and (2) clearing the APIM DTC U0140."
Below are my APIM ASBUILTs screens when I was done:
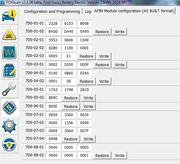
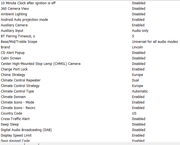
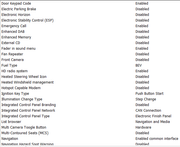
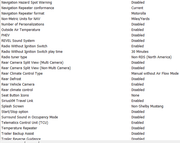

That's pretty much it. There are many forums that discuss changing the alpha numeric values on the ASBUILT screen to change stuff but I have no idea what any of it means. Except for the last fix to "turn of" the ambient lighting app in Sync 3 I used the text based screens to try different settings.
I have one remaining bug that I have not figured out how to remedy. If someone figures it out, I'd appreciate them sharing. When I skip a go time with the MFM app, it turns off go times in the car and I must manually turn go times back on in the car as the app shows they are still enabled. A minor inconvenience I can live with as I only use go times in winter.
Final thoughts:
The non-carplay compliant USB hub does result in the occasional nag screen but it's not annoying enough to be worth the money for the apple blessed USB hub. If someone does upgrade the hub tell me what you did and I'll update this guide. I believe there is some slight power rewiring required as the power plug for the USB hub changed. I did see instructions somewhere on what parts to buy to make the adapter but I didn't save any of that information as I was keeping the factory USB hub.
Also this thread on the process of upgrading a ST Focus may be of interest. It sure helped me: https://www.focusst.org/threads/sync-2-to-sync-3-upgrade.93641/
UPDATE Jan 22, 2022:
So not even a year and the nag screen for the USB hub finally wore me down. No effing way am I going to pay the highway robbery for the "approved" usb hub so I came up with a cost efficient solution. Simply yank the existing hub and replace it with an adapter to the USB cable that connected to the original hub. I have never really needed multiple USB ports. Only reason I could think of for a second USB port would be for Android Auto or phone charging. If I wanted to use android auto I could simply unplug my thumb drive and plug in my phone. Plus there are two convenient 12V sockets I could use with a phone charger if needed.
So where to begin.... Well I didn't take any pictures of the actual removal of the old hub so you'll just have to imagine that part. You must remove the face plate first as it keeps the 4 retention clips locked in place. This is accomplished by prying up the face plate of the usb hub. there are two "pockets" for a pry tool on the back side of the face plate (back as in towards the back of the car). Way to go Ford for this asinine design. Put the removal pry point in the most inaccessible place possible. *end of rant. Anyway then it is fairly easy to pull the hub up. Unfortunately the wires are not long enough to pull it out far enough to disconnect the wires.
To finish removal you must remove the back cover of the center console to access the wire connectors. There is 1 Torx T-20 screw you have to remove.
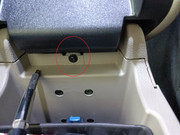
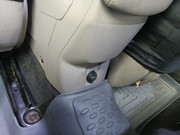
After this there are 4 clips on the back panel and 2 clips for the top "ears." Below is how the top of the back is retained:
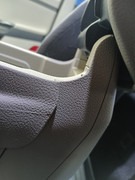
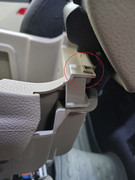
4 clips that retain the back panel:
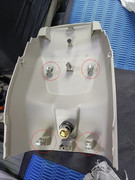
I found the easiest way to remove this panel was to simply pry up and back on the bottom where is could barely fit my fingers in. One of those plastic body pry tools might come in handy here but I was able to do it with just my fingers. once you get one of the bottom 2 clips to pop you can then get your fingers in there and gently pry the rest. Once the panel is loose all you have to do is unplug the wires to the 12V socket and partially open the armrest to be able wiggle the top "ears" free of the little clips.
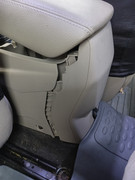
Once it is removed you simply unplug the power and USB connectors and pull out the hub. The pictures below will show what we have at this point. The power connector, USB, and orange plug for the 12V socket:
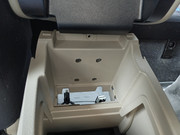
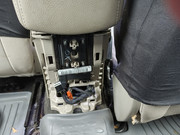
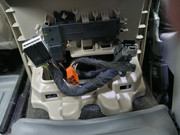
As you can see above there is simple a male mini usb connector on the USB cable that goes up to the Sync3 APIM. We just need to convert this to a standard USB type A female connector for a thumb drive or phone.
I was unable to locate a panel mount female USB Type A to female mini USB. I ended up finding this female USB Type A panel mount with a cable and Type A male end. Coupled that with a female Type A to female mini USB adapter and we have our solution.
www.aliexpress.com/item/33004722386.html
www.aliexpress.com/item/4000055017299.html
Of course if you don't want to wait a month+ you can probably find the same thing on Amazon.com
Next is the question of how do we mount it. Well I got lazy instead of fabricating some sort of panel to fit the open hole, I found there is a ready made bracket for the "approved" usb hubs to retrofit older vehicles like ours.
amazon.com/dp/B07S1VPGNV
I figured I would fill in the hole in the bracket with a scrap piece of plastic I had laying around and then drill a 3/4" (19mm) hole for the panel mount USB socket. I just cut the plastic to shape, glued it in the bracket with Goop, and then marked and drilled the hole.
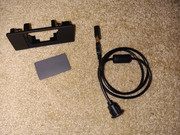
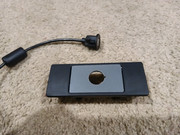
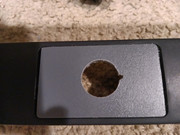
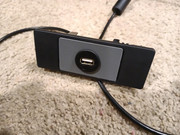
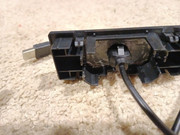
After that we just feed the USB wire thru the mounting hole in the center console and snap the new assembly into place. I used Electrical tap to keep the connectors from coming apart. I'm sure there are better methods but this seemed sufficient to me.
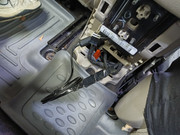
I coiled everything up to fit neatly back in place. Note: Don't be like me and forget to pull the orange 12V socket plug back out so you can connect it when putting the back panel back on. :lol:
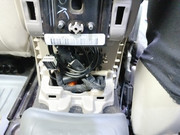
Re-installation of the back panel is the reverse of removal. Just don't forget to plug the 12V socket back in like I did. The finished product looks like this:
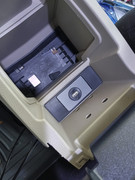
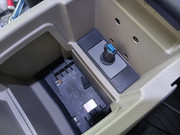
I had thought about doing a dual USB socket and making the second one a charge only port but I rarely charge my phone in the car and it would be drawing power all the time the car is on. Besides there are two convenient 12V sockets on the center console that I can use with a phone charger if needed. That seemed like a better solution to me than a second charge only USB port.
Sync 3 ditches Microsoft windows CE in favor of Blackberry's QNX operating system. Besides new features and a better UI, the touch screen is MUCH more responsive.
Hardware for the upgrade is as follows:
- Sync 3 APIM and screen. (the Sync 2 screen is not compatible with the Sync 3 module).
- GPS antenna with a Fakra connector (Sync 3 uses a separate GPS antenna unlike Sync 2). I tried a cheaper one by Bingfu that was DOA. Just look for one with a Fakra connector.
- (optional) new USB hub and wiring adapter. Not sure what we need but maybe one of these? (HU5Z19A387A Single USB, HC3Z-19A387-B Double USB) Will update when I have more info.
- ODBII USB dongle and a laptop with FORScan
The USB hub is only required because of crapple's greedy corporate policies of making manufacturers pay a ransom for their hardware to work with crapple phones. If you use android you can use the original USB hub and not fork out ~$50 for a new USB hub.
You can find a Sync 3 APIM in some 2016 models and all 2017+ Lincoln/Ford vehicles. As far as I know all 2016 Focus and Escape were Sync3, there may be other models.
The hard part is finding a Sync 3 APIM with NAV. From what I can tell NAV was optional on the Focus titanium trim but standard on the Escape Titanium trim. So this is what I set out to find.
Aside from local yards, I used car-part.com searching for "TV-screen" of various years Fords/Lincolns. We need an 8" screen. While the Fiesta had Sync 3 it had a smaller screen. You need to be careful as many junkyards will remove the APIM from the back of the screen and then try to sell them as separate pieces for ridiculous prices. I just called the yard and asked if they included the module on the back of the screen. Most places were confused by this as the APIM is not something they inventory. The yard I finally bough from, I had to specifically ask them to include the module with the screen. They said it was not inventoried for them and depending on whoever was pulling the screen from the vehicle they may or may not remove the APIM unless specifically directed not to.
I have compiled a list from several sources with known NAV and Non-NAV APIM part numbers The one I bought was not on either list but it came from a 2018 Escape Titanium so I was fairly confident it had NAV. JJ5T-14G370-ACC
My list compiled in Excel format:
It appears the only difference between the NAV and non-NAV is the size of the EMMC storage chip. The non-NAV do not have enough storage to hold the maps. You can enable the NAV function but you get an error as there are no maps on the unit and no way to add them.
The mounting brackets will be different between the various vehicle models but the brackets from the Sync 2 screen can be reused with the Sync 3 screen. All you need is a T8 torx bit to swap brackets from your existing screen.
This video should help give a good idea of how to remove the bezel around the screen and the screen itself. It is from a how-to install a bypass so you can use the screen while in motion with a video input or add a back up cam to vehicles not originally equipped with them. There are 2 connectors you need to undo to remove the bezel. Both have a latch that you have to squeeze to release.
https://youtu.be/MumIkND0suk
Simply unplug and remove the old screen/apim.
With the exception of adding the new GPS antenna, install is the reverse of removal. You can put the GPS antenna wherever you see fit. I used some 3M double stick emblem tape and reached thru the hole where the screen was, up under the dash next to the center speaker and stuck it on something that was under there. Then you can just stuff the extra antenna wire behind the APIM/screen. The idea is the antenna module needs a clear view of the sky to work best. The plastic of the dash is transparent to the GPS radio signals, metal is not.
Once you have the new screen/APIM all plugged in, I recommend turning things on to make sure it works before buttoning things back up. With the bezel not installed it will create several DTCs but not to worry, as these can all be cleared once we have things back together.
The next step is updating the asbuilt data so the APIM knows what modules your car has and can enable the appropriate features.
I simply found a '18 FFE for sale onlne and went to https://www.motorcraftservice.com/AsBuilt with the vin to download the asbuilt file. You can download the asbuilt file I used here. I figure this is close enuff to my '14 FFE.
This Video shows how to update your car's asbuilt data with the "18 asbuilt file above. https://www.youtube.com/watch?v=OgULPZKISZw
This gets you 90% there but there are still a few tweaks to make things happy. First I wanted to enable climate controls in Sync, not because it's particularly useful, just because I can. I also discovered the "repeater" function. it makes the climate control temp settings appear at the top of the screen when not on the climate control screen. This is done by changing parameter "Climate Control Repeater" = "Dual."

I believe it was changing the parameter "Climate Domain" = "Enable" that turns on the climate screen. For some reason you must use "Europe" for "Climate Control Strategy" too.
Other than that I played around with startup/shutdown screens. What options works seems to depend on what version of Sync 3 you have installed. Before installing Version 3.0 I had Version 2.3, I was able to use the GT startup/shutdown and GT theme. After updating to version 3.0 it didn't work. I settled for the Mustang startup screen with the Lincoln Timeless theme. Which by default gives me the Lincoln shutdown screen LOLz. My poor FFE no longer knows what it is. To get the Lincoln Timeless theme to work I had to change the "Brand" setting to Lincoln.
At this point everything worked except the ambient lighting controls in Sync 3. I also got APIM DTC U0140 that wouldn't go away. I assume this is because my '14 does not have the hardware for Sync to control the ambient lighting as it is already controlled by the module in the overhead console. I found the solution on an Escape forum. This involved changing a parameter which solved the problem. "My solution was to change 7D0-01-02 from xxxA xxxx xxxx to xxxD xxxx xxxx. This had the effect of (1) removing the "Ambient Lighting" settings screen from the Sync 3 display (which I view as unnecessarily redundant since I have the headliner controls, not to mention the Sync 3 ambient lighting buttons not working) and (2) clearing the APIM DTC U0140."
Below are my APIM ASBUILTs screens when I was done:


That's pretty much it. There are many forums that discuss changing the alpha numeric values on the ASBUILT screen to change stuff but I have no idea what any of it means. Except for the last fix to "turn of" the ambient lighting app in Sync 3 I used the text based screens to try different settings.
I have one remaining bug that I have not figured out how to remedy. If someone figures it out, I'd appreciate them sharing. When I skip a go time with the MFM app, it turns off go times in the car and I must manually turn go times back on in the car as the app shows they are still enabled. A minor inconvenience I can live with as I only use go times in winter.
Final thoughts:
The non-carplay compliant USB hub does result in the occasional nag screen but it's not annoying enough to be worth the money for the apple blessed USB hub. If someone does upgrade the hub tell me what you did and I'll update this guide. I believe there is some slight power rewiring required as the power plug for the USB hub changed. I did see instructions somewhere on what parts to buy to make the adapter but I didn't save any of that information as I was keeping the factory USB hub.
Also this thread on the process of upgrading a ST Focus may be of interest. It sure helped me: https://www.focusst.org/threads/sync-2-to-sync-3-upgrade.93641/
UPDATE Jan 22, 2022:
So not even a year and the nag screen for the USB hub finally wore me down. No effing way am I going to pay the highway robbery for the "approved" usb hub so I came up with a cost efficient solution. Simply yank the existing hub and replace it with an adapter to the USB cable that connected to the original hub. I have never really needed multiple USB ports. Only reason I could think of for a second USB port would be for Android Auto or phone charging. If I wanted to use android auto I could simply unplug my thumb drive and plug in my phone. Plus there are two convenient 12V sockets I could use with a phone charger if needed.
So where to begin.... Well I didn't take any pictures of the actual removal of the old hub so you'll just have to imagine that part. You must remove the face plate first as it keeps the 4 retention clips locked in place. This is accomplished by prying up the face plate of the usb hub. there are two "pockets" for a pry tool on the back side of the face plate (back as in towards the back of the car). Way to go Ford for this asinine design. Put the removal pry point in the most inaccessible place possible. *end of rant. Anyway then it is fairly easy to pull the hub up. Unfortunately the wires are not long enough to pull it out far enough to disconnect the wires.
To finish removal you must remove the back cover of the center console to access the wire connectors. There is 1 Torx T-20 screw you have to remove.


After this there are 4 clips on the back panel and 2 clips for the top "ears." Below is how the top of the back is retained:


4 clips that retain the back panel:

I found the easiest way to remove this panel was to simply pry up and back on the bottom where is could barely fit my fingers in. One of those plastic body pry tools might come in handy here but I was able to do it with just my fingers. once you get one of the bottom 2 clips to pop you can then get your fingers in there and gently pry the rest. Once the panel is loose all you have to do is unplug the wires to the 12V socket and partially open the armrest to be able wiggle the top "ears" free of the little clips.

Once it is removed you simply unplug the power and USB connectors and pull out the hub. The pictures below will show what we have at this point. The power connector, USB, and orange plug for the 12V socket:


As you can see above there is simple a male mini usb connector on the USB cable that goes up to the Sync3 APIM. We just need to convert this to a standard USB type A female connector for a thumb drive or phone.
I was unable to locate a panel mount female USB Type A to female mini USB. I ended up finding this female USB Type A panel mount with a cable and Type A male end. Coupled that with a female Type A to female mini USB adapter and we have our solution.
www.aliexpress.com/item/33004722386.html
www.aliexpress.com/item/4000055017299.html
Of course if you don't want to wait a month+ you can probably find the same thing on Amazon.com
Next is the question of how do we mount it. Well I got lazy instead of fabricating some sort of panel to fit the open hole, I found there is a ready made bracket for the "approved" usb hubs to retrofit older vehicles like ours.
amazon.com/dp/B07S1VPGNV
I figured I would fill in the hole in the bracket with a scrap piece of plastic I had laying around and then drill a 3/4" (19mm) hole for the panel mount USB socket. I just cut the plastic to shape, glued it in the bracket with Goop, and then marked and drilled the hole.


After that we just feed the USB wire thru the mounting hole in the center console and snap the new assembly into place. I used Electrical tap to keep the connectors from coming apart. I'm sure there are better methods but this seemed sufficient to me.

I coiled everything up to fit neatly back in place. Note: Don't be like me and forget to pull the orange 12V socket plug back out so you can connect it when putting the back panel back on. :lol:

Re-installation of the back panel is the reverse of removal. Just don't forget to plug the 12V socket back in like I did. The finished product looks like this:


I had thought about doing a dual USB socket and making the second one a charge only port but I rarely charge my phone in the car and it would be drawing power all the time the car is on. Besides there are two convenient 12V sockets on the center console that I can use with a phone charger if needed. That seemed like a better solution to me than a second charge only USB port.


